receive a notification of your Home Assistant IP address
TLDR: one morning too often I’ve woken to find that my ‘smart’ things has gone stupid and they haven’t turned on because the Raspberry Pi running Home Assistant has gone inaccessible. Your Home Assistant should have a fixed IP address but there are times when you’re not too sure what’s going on – eg when you recently set it up. Here is how to get Home Assistant to notify you of its IP address when it starts up or whenever you like. The email or the app notification are fairly easy to get working. Some tips on mitigating Home Assistant failures follow.

set up email notifications in Home Assistant
I use the ‘SMTP platform’ (link to Home Assistant SMTP) to receive emails sent as notifications. If you use Gmail there is a more tricky method but if you’ve set up the Home Assistant mobile app you’re already good to go if you enable its notifications.
USE FILE EDITOR TO ADD THE FOLLOWING TO CONFIGURATION.YAML

notify:

  - name: mail_roger
    platform: smtp
    server: smtp.myemailserver.co.uk
    port: 587
    timeout: 15
    sender: !secret mymail@
    encryption: starttls
    username: !secret mymail@
    password: !secret mymail@password
    recipient: !secret mymail@
    sender_name: home assistant notify

USE FILE EDITOR TO ADD THE FOLLOWING TO SECRETS.YAML

mymail@: myemailaddress
mymail@password: myemailpassword
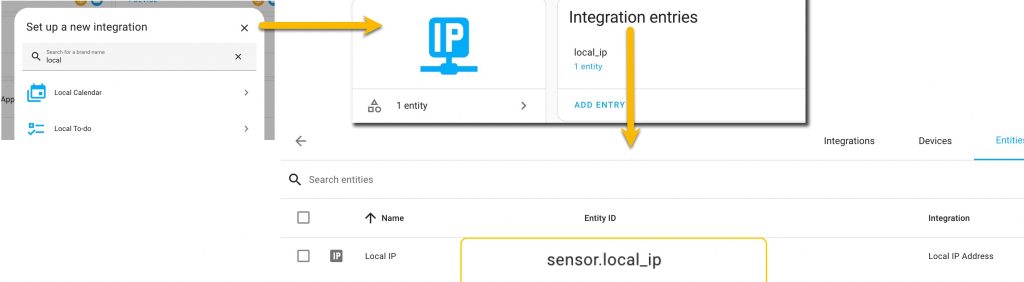
set up the Local IP address integration
Go to Settings > Devices/Integrations > Add Integration > search for Local IP > Submit. Look for the entity named sensor.local_ip
create an Automation to send you the Home Assistant IP address
Go to Settings > Automation > [Create Automation] > select: Create New Automation
- For the ‘when trigger’ choose eg a time of day if you want to receive a daily email. Also perhaps create a ‘when trigger’ for ‘Home Assistant Started’.
- If you want to know if the IP address changes: create a ‘when trigger’ for Entity > State > Local IP address and leave the rest blank (see code section below).
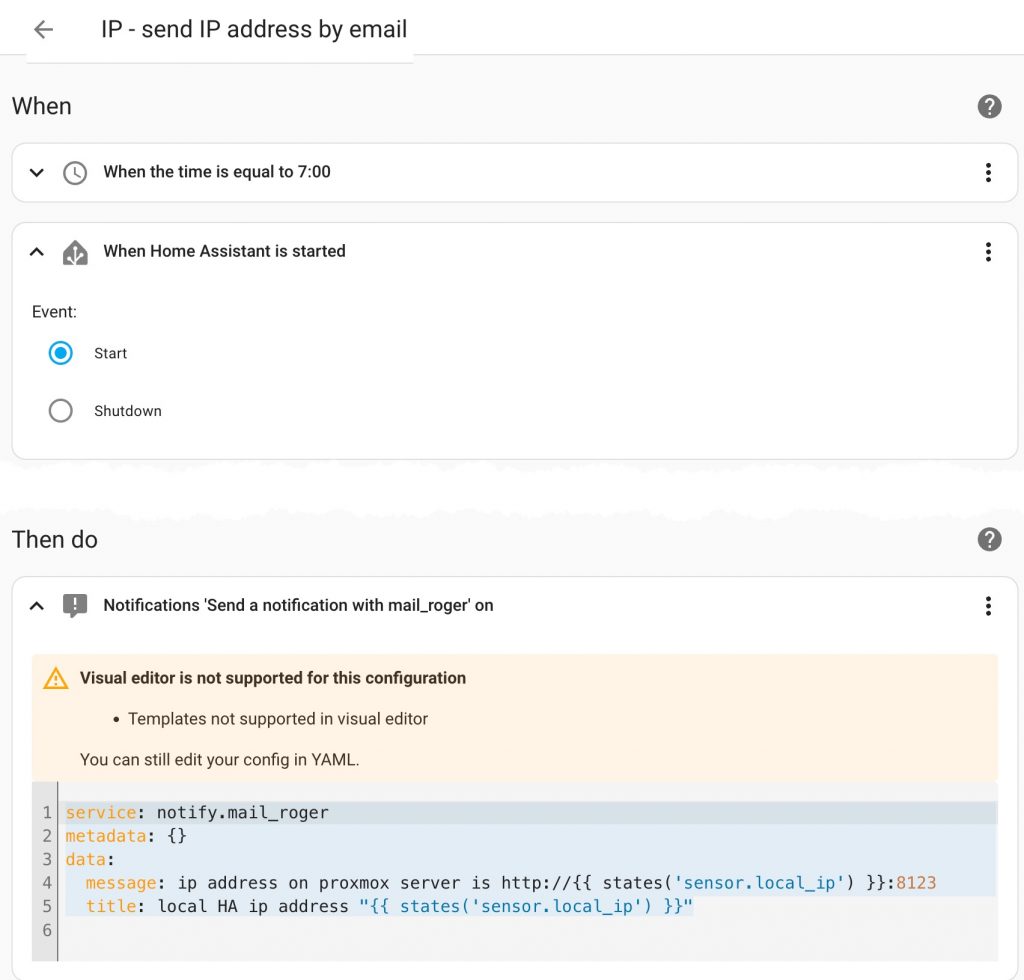
- For the ‘Then Do/Action’ choose Notification > Select the entity for email sending (notify email roger). Here’s how it might look in the UI and in YAML code:
#When you're creating the Automation go to Edit in YAML and you'll see this


alias: IP - send IP address by email
description: "send me an email when IP address changes or daily or when Home Assistant starts"
trigger:
  - platform: time
    at: "07:00:00"
  - platform: homeassistant
    event: start
  - platform: state
    entity_id:
      - sensor.local_ip
condition: []
action:
  - service: notify.mail_roger
    metadata: {}
    data:
      message: >-
        ip address on proxmox server is http://{{ states('sensor.local_ip') }}:8123
      title: local HA ip address "{{ states('sensor.local_ip') }}"
mode: single

#In AUTOMATIONS > the notification action will look like this:

service: notify.mail_roger
metadata: {}
data:
  message: ip address on proxmox server is http://{{ states('sensor.local_ip') }}:8123
  title: local HA ip address "{{ states('sensor.local_ip') }}"
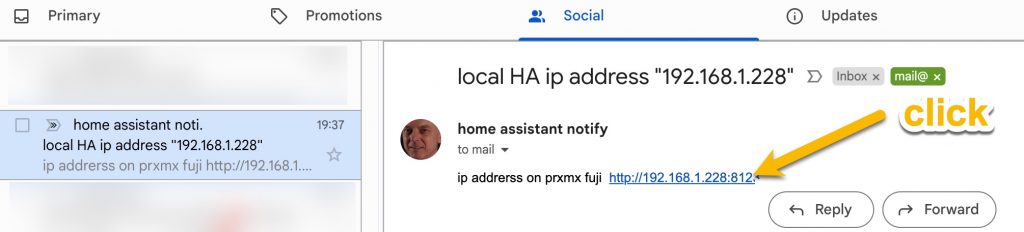
receive a email when Home Assistant starts
Your email might look like this:
tips: some ways that I mitigate against smart home failure
A quick aside: I’ve never found the reason why my Home Assistant becomes inaccessible:
- every so on go to System > Logs to find errant integrations and either fix them or delete them from your set up.
- less is more – the more things you depend on, the more points of failure that you have. Do less with Home Assistant and it’ll do things more reliably. I think.
- run a second, backup Home Assistant appliance* on another computer such as a Synology, QNAP or a Homelab server running on Proxmox. Copy a backup configuration over to the second HA and delete unimportant integrations and automations. My two almost identical Home Assistant instances seem not to conflict with each other. I devised the trick above because I am too lazy to get this second HA to self assign an IP address. Furthermore my router won’t allow me to assign any more fixed IP addresses. *Home Assistant is called this as it’s more a collection of services than a single app. The Home Assistant ‘image’ can be installed on an SD card or a USB stick in an old PC or in a virtual machine. See ‘install on X86 devices’ on the HA website.
- I no longer use Home Assistant to turn on critical appliances such as my water heater and borehole water pump. Instead I use the smart device’s mobile app (eg ewelink; TPlink Kasa) and set a schedule in the smart device’s mobile app. I now find that these work without fail. It’s a rare event that the Internet or Cloud services fail.
- I power the Raspberry Pi running Home Assistant, and the local ethernet switch via a UPS in case of a power cut. This should mitigate against a sudden shutdown – in theory. I also use NUT tools to manage my UPS although this setup has too many points of failure to rely upon it.